My art style and methods are always changing as I learn, but
this will give you a general idea of my portrait art technique. I don't pretend to be an expert, and I am always learning.
But perhaps you will find some information here you can use as you learn how to draw pencil portraits.
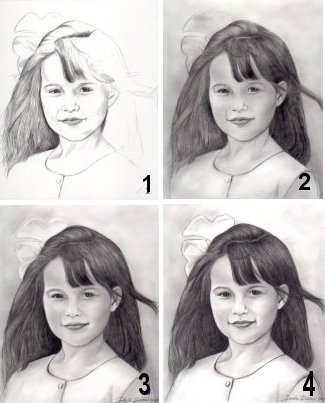
STEP 1
I pick out my paper - usually Strathmore Bristol 400, smooth. Even though it's 'smooth,' I gently feel each side and
pick the one that is smoother. Usually one side is more toothy in texture. I draw on what I feel to be the smoothest
side of the paper.
The general areas are sketched in lightly using a
2B mechanical pencil. If a 3B or a 4B is what I have in my hand already, that will do the job just as well! Some shading is
done to determine the dark areas. A light gray colored pencil or a lighter graphite pencil like H is used if
the final artwork is to be done in colored pencil. Colored pencil doesn't mix well at all with graphite.
STEP 2
Shading/blending is begun, using only tissues (like Kleenex,
no lotion type and/or a chamois). Usually I work in specific direction on each piece, to match the skin tone/shading.
Dark areas become more defined. I blend dark areas into the light, some missed details here and there are noticed and
touched up.
If deeper darks are needed, I rub tissue on some of
the darker area (in this instance, hair) to apply as needed in parts of the face.
This is the stage in drawing I have nicknamed the 'muddy' stage, because if my customers saw
it right now, they'd wonder why on earth they hired me - it looks pretty awful right now!
STEP 3
More dark areas of the hair are added, hair is filled in - noting
the geometric shapes of dark versus light areas.
Once more of the dark is put in, I turn both the reference
photo and the artwork upside down to be able to identify shapes that need adjusting. Some detailing of the
eyes is done at this time. Many times I'll turn the art and the reference photo sideways also.
I try to look at them from as many views as I can.
STEP 4
Now I'm thinking - 'do I have a likeness?'
This part is harder for me to explain, but I'll try. If my reaction to the artwork is a little ho-hum, I realize
I haven't attained a likeness...it's missing the spark of that person - so I think and look - what makes that person
unique? Is it the little dimple, do the eyes need a little more sparkle, a little more crinkle at the edge...? If
it doesn't have that spark of the person or animal in it, I keep looking for that special 'it.'
I'm looking for the personality.
I touch up small dark areas with a tortillion (like a loose blending stump - a rolled up paper used for blending)
and I touch up light areas with the kneaded rubber eraser.
STEP 5
Highlights in hair and face are brought out. This is where the
'painting with graphite' comes in.
I use several types of erasers to create desired look for the
different features of the face and hair. Staedtler drafting pencils, Sanford typewriter eraser, and DeSign kneaded rubber
erasers, and an eraser pen made by Pentel called ClikEraser. I erase lightly some areas of hair and then draw the detail hairs
back in, usually with a harder pencil and/or mechanical pencil. I have also found that the edge of the clickeraser will make
very fine and clean lines for highlights in hair - just snip the eraser off straight with scissors or a razor blade to get
the sharp edge. These clickerasers are so affordable, it's nice to have several handy and prepared for different uses in your
portraits.
Final details are added or finetuned, like eyelashes
and highlights to the lips and eyes. Eyelashes are usually
done with a mechanical pencil because it's wonderful for the small details.